Type the following words in Google and click I'm Feeling Lucky
google gothic
google gangsta
google 1337
elgoog
laugh
find chuck norris
google loco
google easteregg
doogle
tubegirl
lol limewire
google pacman
no brain
This guide is for permanently rooting HTC Desire running stock Android Gingerbread 2.3.3 . If you want to temp root then you can follow this guide. Before starting please be aware that problems while rooting can brick your phone. While the process in this guide is relatively simple and easy, I can't be held responsible for whatever happens. Enable USB debugging in your phone by going to Settings -> Applications -> Development . Plug in your phone to the computer. Go to Revolutionary website http://revolutionary.io/ . From there download revolutionary software. Leave this browser tab opened. We need to generate Serial key later. Extract the downloaded software on your computer and run the software with root permission. $sudo ./revolutionary It will tell you your serial number and ask for the beta key. Copy the serial number and go to the browser tab we left open while downloading the software. Put the serial key there...
WPA or even WPA2 can be easily cracked under 10 hours provided that WPS is enabled on the router. The software we'll use is reaver . The hardware I'm using is Intel(R) PRO/Wireless 3945ABG/BG on Ubuntu 11.04 and driver is iwl3945. First install the necessary libraries to compile the software. Run the following command in terminal to do so. sudo apt-get install libsqlite3-dev libpcap0.8-dev build-essential Now open terminal and go inside /tmp folder. Download reaver from here by running the command wget -c http://code.google.com/p/reaver-wps/downloads/detail?name=reaver-1.4.tar.gz&can=2&q= Now extract it by running tar xf reaver-1.4.tar.gz Now run the following commands to compile the software. ./configure make sudo make install After this reaver will be installed on your system. Now let's install aircrack-ng(Optional). We'll not be using aircrack directly but use its tool to assist our cracking. You can install it by running: sudo apt-get...
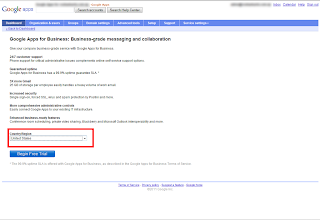
Once your default country is selected in your Google Apps account you cannot change it. Sometime it becomes necessary to change the default country for eg: when you change your country. To force the change follow the steps below: Login to your Google Apps as an administrator. In your dashboard you'll see " Try Google Apps for Business Free" . Click that link. After that you'll get option to change the country as show in the figure below. Select your desire country and click ' Begin Trial '. Don't worry, we don't have to pay any buck. After this you'll reach to Google Checkout Page. At this moment close your browser. Yes close it. Verify if your change has been saved by going to Domain Setting -- Account Information -- Default Country
This comment has been removed by a blog administrator.
ReplyDelete